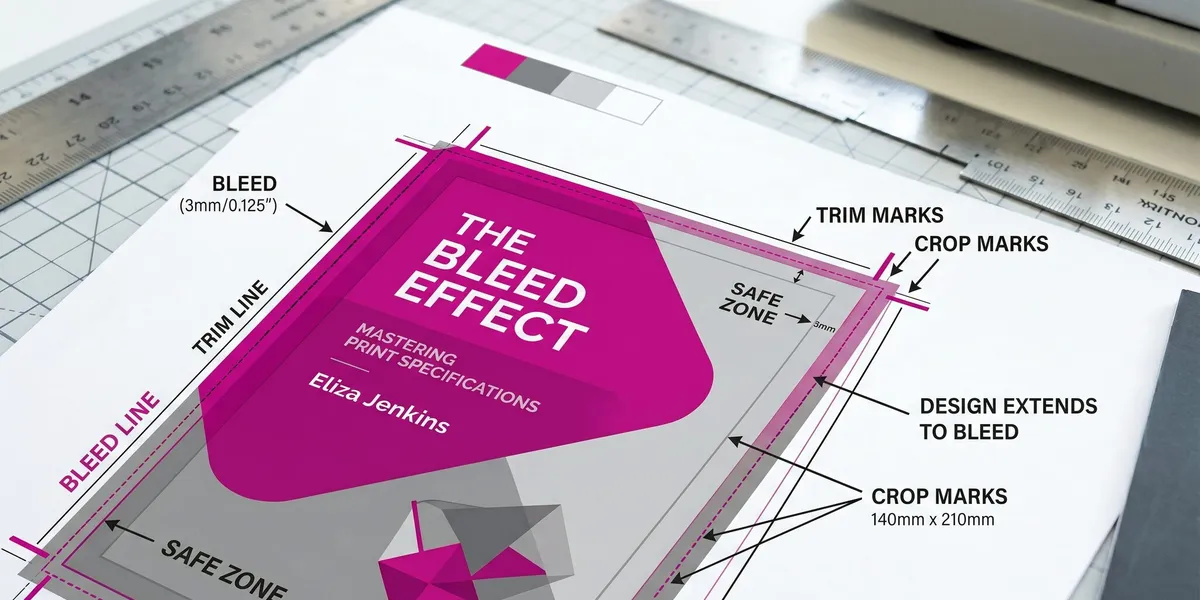
Bleed is the extra area of your book cover design that extends beyond the trim line — it gets cut off during printing to ensure your artwork reaches the very edge of the finished cover with no white borders. Getting bleed settings wrong is one of the most common reasons book covers get rejected by printers.
What Is Bleed in Book Cover Design?
Bleed is a safety margin built into your cover file. When a printer cuts your book cover to its final size, the cutting isn’t perfectly precise — it can shift by 1-2mm in any direction. The bleed area accounts for this variance.
Without bleed, even a tiny cutting shift creates a visible white strip along one edge of your cover. With bleed, the artwork extends past the cut line, so the image still reaches the edge no matter where the cut falls.
Standard bleed for book covers: 0.125 inches (3.175mm) on all sides.
This means if your finished book is 6” x 9”, your cover file should be at least 6.25” x 9.25” to include bleed on all four edges.
Bleed Settings by Printer/Platform
| Printer/Platform | Required Bleed | File Format | Notes |
|---|---|---|---|
| Amazon KDP | 0.125” (3.175mm) | Use their cover calculator tool | |
| IngramSpark | 0.125” (3.175mm) | Safety margin of 0.25” from trim also required | |
| Barnes & Noble Press | 0.125” (3.175mm) | Similar to KDP requirements | |
| Lulu | 0.125” (3.175mm) | Cover template generator available | |
| Offset printers | 0.125”-0.25” | PDF/TIFF | Check with your specific printer |
| BookBaby | 0.125” (3.175mm) | Templates available for all trim sizes |
The 0.125” standard is nearly universal for POD (print-on-demand) publishing. Offset printers sometimes request 0.25” — always confirm with your specific printer.
Understanding the Cover Zones
Your book cover has four critical zones:
1. Bleed Area (Outermost)
The 0.125” border that extends beyond the trim line. Everything in this zone gets cut off. Never put important content here — only background color or extended artwork.
2. Trim Line
Where the printer cuts. This is your book’s actual finished size. The trim line is not visible on the printed book — it’s a guide in your design file.
3. Safety Margin (0.25” Inside the Trim)
Important text and critical design elements should stay at least 0.25” inside the trim line. This prevents text from being cut off even with maximum cutting variance.
4. Spine
The spine width depends on your page count and paper type. Spine bleed requirements are the same — 0.125” extending past each spine fold line.
How to Calculate Your Full Cover Dimensions
For a full wrap cover (front + spine + back), use this formula:
Total width = Back cover width + Spine width + Front cover width + (Bleed × 2) Total height = Trim height + (Bleed × 2)
Example: 6” × 9” book, 300 pages, cream paper
- Back cover: 6”
- Spine: ~0.68” (varies by paper weight — use your printer’s calculator)
- Front cover: 6”
- Bleed: 0.125” × 2 = 0.25”
- Total width: 6 + 0.68 + 6 + 0.25 = 12.93”
- Total height: 9 + 0.25 = 9.25”
Spine Width Calculators
- KDP: Available in their cover creation tool when you enter page count and paper type
- IngramSpark: Spine width calculator on their website
- General formula: Pages × paper thickness (white: ~0.002252”, cream: ~0.0025”)
Setting Up Bleed in Design Software
Adobe Photoshop
- Create new document at your total cover dimensions (including bleed)
- Set resolution to 300 DPI (minimum for print)
- Color mode: CMYK
- Add guides at 0.125” from each edge (these mark your trim lines)
- Add guides at 0.375” from each edge (these mark your safety margin)
- Extend all background elements to the document edge (past bleed)
Adobe InDesign
- Create new document at your trim size
- Enter 0.125” in the Bleed fields under Document Setup
- InDesign shows the bleed area as a red outline
- Extend artwork to the bleed guides
- Export as PDF with “Use Document Bleed Settings” checked
Canva
- Create a custom design at your total dimensions (trim + bleed)
- Use ruler guides to mark the trim line (0.125” from each edge)
- Extend backgrounds and full-bleed images past the guides
- Keep text inside the safety margin
- Download as PDF Print (300 DPI)
Affinity Publisher
- Create new document at trim size
- Set bleed to 0.125” in Document Setup
- Extend elements to the bleed boundary
- Export as PDF/X-1a with bleed included
Common Bleed Mistakes
- No bleed at all. The #1 rejection reason. If your background doesn’t extend past the trim line, the printer will reject your file.
- Text too close to the trim. Even with proper bleed, text within 0.125” of the trim line may get partially cut. Keep all text 0.25” inside the trim.
- Different bleed on different sides. Bleed must be consistent — 0.125” on all four edges. Don’t apply it only to the top and bottom.
- RGB color mode. Print covers must be CMYK. RGB colors shift during printing and won’t match your screen. Convert before adding bleed.
- Resolution too low. Book covers need 300 DPI minimum. A 72 DPI web image won’t print clearly even with perfect bleed settings.
- Forgetting spine bleed. The spine area needs bleed too — the fold lines have the same cutting variance as the trim edges.
Bleed for Ebook Covers vs. Print Covers
Ebook covers don’t need bleed — they’re displayed digitally at exact pixel dimensions. But if you’re publishing in both formats (which most authors should), you’ll need two cover files:
| Print Cover | Ebook Cover | |
|---|---|---|
| Bleed | 0.125” required | None |
| Resolution | 300 DPI | 72-300 DPI |
| Color mode | CMYK | RGB |
| Dimensions | Trim + bleed + spine | Front cover only |
| Format | JPEG or PNG |
Design the print cover first (at full dimensions with bleed), then export a simplified version for the ebook.
For more on cover design and self-publishing, see our guides on self-publishing platforms and Amazon KDP.
Our Pick — Chapter
Chapter helps you write the book that goes inside that beautifully designed cover. Over 2,147 authors have used the platform to create 5,000+ books — and every one of them needed correct bleed settings for their print editions.
Best for: Nonfiction authors writing and publishing books Pricing: $97 one-time
FAQ
What is the standard bleed for a book cover?
The standard bleed for a book cover is 0.125 inches (3.175mm) on all sides. This applies to most print-on-demand services including Amazon KDP, IngramSpark, and Barnes & Noble Press. Some offset printers may request 0.25” bleed — always confirm with your specific printer before finalizing your cover file.
Why does my book cover need bleed?
Your book cover needs bleed because printing equipment cuts with slight variance — up to 1-2mm in any direction. The bleed area provides extra artwork beyond the trim line so that even with imperfect cuts, the design extends to the very edge of the finished cover with no white borders or gaps.
How do I set up bleed in Photoshop for a book cover?
Set up bleed in Photoshop by creating your document at trim size plus 0.25” total (0.125” on each side) at 300 DPI in CMYK mode. Add ruler guides at 0.125” from each edge to mark trim lines and at 0.375” for safety margins. Extend all background elements to the document edge. Keep text inside safety margins.
Do ebook covers need bleed?
No, ebook covers do not need bleed because they’re displayed digitally at exact pixel dimensions with no cutting involved. Ebook covers use RGB color mode at 72-300 DPI as a JPEG or PNG file. If you publish in both print and ebook formats, create separate cover files with appropriate settings for each.